
Openpyxl Tutorial
This is a comprehensive Python Openpyxl Tutorial to read and write MS Excel files in Python. Openpyxl is a Python module to deal with Excel files without involving MS Excel application software. It is used extensively in different operations from data copying to data mining and data analysis by computer operators to data analysts and data scientists. openpyxl is the most used module in python to handle excel files. If you have to read data from excel, or you want to write data or draw some charts, accessing sheets, renaming sheets, adding or deleting sheets, formatting and styling in sheets or any other task, openpyxl will do the job for you.
If you want to Read, Write and Manipulate(Copy, cut, paste, delete or search for an item or value etc) Excel files in Python with simple and practical examples I will suggest you to see this simple and to the point Python Excel Openpyxl Course with examples about how to deal with MS Excel files in Python. This video course teaches efficiently how to manipulate excel files and automate tasks.
Everything you do in Microsoft Excel, can be automated with Python. So why not use the power of Python and make your life easy. You can make intelligent and thinking Excel sheets, bringing the power of logic and thinking of Python to Excel which is usually static, hence bringing flexibility in Excel and a number of opportunities.
Automate your Excel Tasks and save Time and Effort. You can save dozens or hundreds of hours by Python Excel Automation with just a single click get your tasks done with in seconds which used to take hours of Manual Excel and Data Entry Work.
First
we discuss some of the keywords used in Python excel relationship which
are used in openpyxl programming for excel.
Basics for Python excel openpyxl work:
- An Excel file is usually called as Spreadsheet however in openpyxl we call it Workbook.
- A single Workbook is usually saved in a file with extension .xlsx
- A Workbook may have as less as one sheet and as many as dozens of worksheets.
- Active sheet is the worksheet user is viewing or viewed before closing the file.
- Each sheet consists of vertical columns, known as Column starting from A.
- Each sheet consists of rows, called as Row. Numbering starts from 1.
- Row and column meet at a box called Cell. Each cell has specific address in refrence to Row and Column. The cell may contain number, formula or text.
- The grid of cells make the work area or worksheet in excel.
The start: Reading data from an Excel sheet:
Lets suppose we have this Excel file which we are going to use in our example. Its name is testfile.xlsx. You can either create a new excel file and fill in the data as it is shown in figure or download it and save it in your root folder. Mean the python folder in which all python files are located.| Date Time | Region | Name | Item | Quantity | Rate | Total |
| 7/6/14 4:50 AM | AB | Connor | Pencil | 15 | 1.99 | 29.85 |
| 4/23/14 2:25 PM | DG | Shane | Binder | 20 | 19.99 | 399.8 |
| 5/9/14 4:45 AM | PQ | Thatcher | Pencil | 25 | 4.99 | 124.8 |
| 13/26/2014 9:54:00 PM | AR | Gordon | Pen | 30 | 19.99 | 599.7 |
| 3/15/14 6:00 AM | TX | James | Pencil | 35 | 2.99 | 104.7 |
| 4/1/14 12:00 AM | CA | Jones | Binder | 40 | 4.99 | 199.6 |
| 4/18/14 12:00 AM | ND | Stuart | Pencil | 45 | 1.99 | 89.55 |
Sample file for reading. testfile.xlsx Its better that you create excel file and fill in the same data.
Now after downloading and installing openpyxl and after having this testfile in root folder lets get to the task.In case you don't know what is your root directory for python. Type in the following code at prompt.
>>>import os
>>>os.getcwd( )
We will import operating system, and then call function get current working directory getcwd( )
it will tell the current working directory for python, the result may be like that, as it is in my interpreter.
'C:\\Python34'
Yes you are wise enough to know that I am using Python 3.4 for this tutorial.
If you want to change the current working directory you can use the command
os.chdir( ). For example you have a file named abc.xlsx saved in myfiles folder which is in C: root directory, then you may use
>>>os.ch.dir("c:/myfiles")
With this code now you can work on files saved in myfiles directory on C drive. If you want to work with excel files in Python for a Live 1 on 1 Python Openpyxl Training you may contact us live 1 on 1 interactive Openpyxl training by an expert. Learn each and everything about how to deal with excel files in python like reading, writing, sorting, editing, making high quality graphs and charts in matplotlib.
Opening excel files in Python:
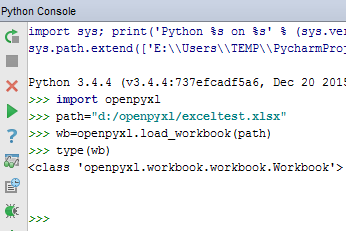
First we will import openpyxl module with this statement
>>> import openpyxl
If there is no error message then it would mean openpyxl has been correctly installed and now it is available to work with Excel files.
Next thing we are going to do is to load the Workbook testfile.xlsx with the help of following code
>>>wb= openpyxl.load_workbook('testfile.xlsx')
openpyxl.load_workbook('testfile.xlsx') is a function. It takes the file name as parameter or argument and returns a workbook datatype. Workbook datatype infact represents the file just like as File object represents a text file that is opened. After loading the testfile.xlsx we will see what type of handle is available by typing
>>type (wb)
<class 'openpyxl.workbook.workbook.Workbook'>
The green colored line should be seen on the python shell. If you get this line up to here then all is well. Now a summary of commands we have typed with their output in python shell. Command typed by us is shown in blue, while response of interpreter is shown in green here and through out this tutorial.
>>> import os
>>> os.getcwd()
'C:\\Python34'
>>> import openpyxl
>>> wb=openpyxl.load_workbook('testfile.xlsx')
>>> type(wb)
<class 'openpyxl.workbook.workbook.Workbook'>
>>>
Accessing sheets from the loaded workbook:
We have to know the name of excel file to access it, now we can read and know about it more. To get information about the number of sheets in a workbook, and their names there is a function get_sheet_names( ). This function returns the names of the sheets in a workbook and you can count the names to tell about total number of sheets in current workbook. The code will be
>>> wb.get_sheet_names()
['Sheet1', 'Sheet2', 'Sheet3']
You can see that the function has returned three sheet names, which means the file has three sheets. Now you can do a little practice. Change the sheet names, save the file. Load the file again and see the results. We change the sheet names as S1, S2, S3 and then save the Excel file. We have to load the file again so that changes appear in the response. We are creating a new workbook object. Code will remain same. Write in the following code.
>>> wb=openpyxl.load_workbook('testfile.xlsx')
>>> wb.get_sheet_names()
['S1, 'S2', 'S3']
Now we see that sheet names are changed in output. You can practice a bit more. Please keep in mind, the more you work on this, the more you learn. Books and tutorials are for guidance, you have to be creative to master the art. Now change the sheet names to their orginal ones again. You will have to load the file once again for changes to take effect.
After knowing names we can access any sheet at one time. Lets suppose we want to access Sheet3. Following code should be written
>>> import openpyxl
>>> wb=openpyxl.load_workbook('testfile.xlsx')
>>> wb.get_sheet_names()
['Sheet1', 'Sheet2', 'Sheet3']
>>> sheet=wb.get_sheet_by_name('Sheet3')
the function get_sheet_by_name('Sheet3') is used to access a particular sheet. This function takes the name of sheet as argument and returns a sheet object. We store that in a variable and can use it like...
>>> sheet
<Worksheet "Sheet3">
>>> type(sheet)
<class 'openpyxl.worksheet.worksheet.Worksheet'>
>>> sheet.title
'Sheet3'
>>>
if we write sheet it will tell which sheet is it pointing to, as in code, the shell replies with Worksheet "Sheet3".
If we want to ask type of sheet object. type(sheet)
It will tell what is the object sheet pointing to?
>>> type(sheet)
<class 'openpyxl.worksheet.worksheet.Worksheet'>
sheet.title tells the title of sheet that is referenced by sheet object.
Some more code with sheet. If we want to access the active sheet. The interpreter will write the name of active sheet>
>>> wb.active
<Worksheet "Sheet1">
Accessing data in Cells of Worksheet:
For accessing data from sheet cells we refer by sheet and then the cell address.
>>> sheet['A2'].value
datetime.datetime(2014, 7, 6, 4, 50, 30)
Another way of accessing cell data is like
>>> e=sheet['B2']
>>> e.value
'AB'
>>> e.row
2
>>> e.column
'B'
>>>
Getting data from cells with the help of rows and columns:
>>> sheet.cell(row=2, column=4)
<Cell Sheet1.D2>
>>> sheet.cell(row=2, column=4).value
'Pencil'
Instead of getting one value from a column, now we print whole column, see the syntax. Ofcourse we will use iteration else we will have to write print statement again and again.
For printing whole column the code will be
>>> for x in range (1,9):
print(x,sheet.cell(row=x,column=4).value)
1 Item
2 Pencil
3 Binder
4 Pencil
5 Pen
6 Pencil
7 Binder
8 Pencil
>>>
Now after printing the one complete column, what comes next? Print multiple columns, and as our file is a small one, we print all the columns here. See the code here.
for y in range (1,9,1):
print(sheet.cell(row=y,column=1).value,sheet.cell(row=y,column=2).value,
sheet.cell(row=y,column=3).value,sheet.cell(row=y,column=4).value,
sheet.cell(row=y,column=5).value, sheet.cell(row=y,column=6).value,
sheet.cell(row=y,column=7).value,sheet.cell(row=y,column=8).value)
This code will print all the columns in the worksheet. Hence upto now, we accessed an excel file, loaded it in memory, accessed sheets, and in the end accessed individual cells, keep tuned for next. (Professor M.N)
If you want to Read, Write and Manipulate(Copy, cut, paste, delete or search for an item or value etc) Excel files in Python with simple and practical examples I will suggest you to see this simple and to the point Python Excel Openpyxl Course with examples about how to deal with MS Excel files in Python. This video course teaches efficiently how to manipulate excel files and automate tasks.
Everything you do in Microsoft Excel, can be automated with Python. So why not use the power of Python and make your life easy. You can make intelligent and thinking Excel sheets, bringing the power of logic and thinking of Python to Excel which is usually static, hence bringing flexibility in Excel and a number of opportunities.
Automate your Excel Tasks and save Time and Effort. You can save dozens or hundreds of hours by Python Excel Automation with just a single click get your tasks done with in seconds which used to take hours of Manual Excel and Data Entry Work.
Now after reading Excel files in Python, its time to learn How to write to Excel Files in Python